Showing posts with label applique. Show all posts

Sunday, October 2, 2011

Scary Squares Halloween Table Topper

Here is the third pattern I was hoping to have ready a few days ago for the launch of my Etsy Shop

It's a Halloween Table Topper, made using most of a Charm Pack, and some extra black 5" squares for the embroidery panels.  The fabric is Haunted Mansion by Sanae

The pattern includes instructions for how to do the spider web quilting design.  I have to say that I'm rather pleased with how that came out!  My free motion quilting skills are definitely improving.

I guess now I'm allowed to buy some more Halloween fabric for next year!

Have you got any Halloween crafts in the pipeline?

Friday, February 25, 2011

My First Quilt....or Cwilt

Following a link from Samelia's Mum, I found bluepatch quilter and a post about her first quilt.  Sounded like a great idea so I thought I'd join in!

My first quilt was made for my sister-in-law for Christmas.  My inlaws do 'Kris Kringle' so we all only have to provide one gift.  Most years we have a theme, and sometimes it has to be handmade.  That year the gift had to be something starting with the first letter of the person's name.  I got Carol.... so I made a "C" Cwilt

Sadly I didn't get very good photos of it.  The above was taken with my phone.

Each star block contains a picture of something beginning with C:
Clouds, choir, curtains, cow, castle, couch, cats, clothes(line), compass, corset, computer, cards, cake, church, cherries, cheese, cotton, candycanes

I tried to pick things which Carol liked.  I hope I got some right ;)

The pictures are all appliqued by hand using blanket stitch with a few extras here and there.  The curtains are made of lace and are 3D, I believe the window frames are ribbon.  The cat tails are embroidered, probably back-stitch I'd say (can't remember).  The candycanes are made of red and white striped ribbon which was twisted then placed flat so that the stripes bend around the curve of the cane.  My (now) husband helped with some of the pictures, you can tell which are his by the more interesting blocks!  The castle, cats, couch and church are his.  We actually make quite a good team.  He'd draw a nice picture then I'd go over it, remove some of his little details and turn it into a 'block' picture that could be appliqued more easily.  Although I believe if we did it again now, I'd probably be able to applique in more detail than I could then.

The quilt was pieced and quilted on my Monster Machine (industrial straight stitcher), before I knew about walking and 1/4" feet.  The back is black and white checks to go with the black and white theme of the front.

I don't think I go back and look at this photo often enough.  I've learnt so much since then, but sometimes I forget how much work I put into this one.

What did I get that year that started with the same letter as my name?  A handmade steampunk kaleidoscope!

Thursday, February 17, 2011

Elephants on Parade

My baby elephants quilt is finished!  It's only taken me a little over 18 months, but I got sick of seeing it lying around the sewing room so I decided I'd better get in and do it.

I'd been working on the last of the machine quilting over the previous couple of months.  I'd decided on a wavy pattern as you can see, which really should have been done with a free motion foot but at the last minute I got nervous and did it with a walking foot.  I had to repeatedly stop, raise the foot, and reangle the fabric, but it worked for me in the end.  It's not perfect but it's the most fancy quilting work I've ever done!

I think one of my main issues with the quilting was marking out the design on the purple border.  On all the other colours I was just able to see the design from the paper underneath and trace it through, but the purple was too dark.  I think I tried all the white marking methods I could think of.  I got dressmakers carbon paper, I used a tracing wheel, even got out my talc powder!  None of them seemed to leave an impression.  I think in the end I put the pattern underneath and could just make out some major intersections and kind of made up the rest.  The purple quilting isn't as good as the other colours.

Speaking of colours.... I used monofilament thread for the border quilting, as I had used on the coffee quilt. I don't think I'll use that again unless I really don't want the quilting thread to show.  I used it for this quilt because I just wanted the effect of the quilting, didn't specifically want the lines to show up. Next time I'll just try using a matching coloured thread.  Nothing specifically wrong with the monofilament but it was just very fiddly sewing the ends in and things like that.

On the topic of quilting, I did hand quilting around the outside of the elephants.  You can't really see the quilting on the front, but it does add a certain amount of dimension to the blocks.  I had hoped on the back that there would be an outline of the elephant in white, but the thread I chose was not thick enough (Gutermann Quilting thread) and the backing fabric is just too busy.

The other problem I had with this quilt was the binding.  The pattern called for one strip of each of 4 colours, one for each side in a different colour to the border strip on that side.  When I'd finished my quilt and measured it up, my strips weren't long enough.  The quilt's finished size was supposed to be 112cm, but I think mine came out ever so slightly longer because of inaccurate seams, and also my fabric was 112cm from selvedge to selvedge, but I didn't want to include the selvedges in my sewing.  Since I had to join the binding strips anyway, I decided to make the bindings match the border, including doing the little bit around the corners (you can see this in the first photo).

The other thing I did to this quilt to make it a little more unique was to applique one square instead of embroidering it.

And the final bit of a quilt which often takes the longest...... is the label on the back!  I'd found an image on the internet somewhere ages ago that I decided I wanted to use, so that settled the decision of how I was going to make the label.  It was to be printed on Matilda's Own Injet Printable Fabric.  I had used this once previously for a quilt label.  Of couse it meant a trip to the shops for hubby to pick up a new colour catridge for the printer!

I edited the image, changing the colours of the elephants to match the quilt.  This took a few goes of printing on paper because of course colours on the screen don't look the same in print.

I also embroidered elephant footprints onto the label.  I had intended to hand quilt some foot prints into the cream inner boarder, but after the time it took me to quilt around the elephants I'd had enough hand quilting for now.  This was my compromise to get some footprints onto the quilt.  The printable fabric is rather had to sew through I discovered.  Embroidering the footprints was just bearable, given that I hadn't hooped it up.  Attaching the label to the quilt was another matter!  I was trying to only pick up a few threads for each stitch to make an invisible stitch, but the threads didn't separate very easily to let the needle through, and on more than one occasion where I had carefully picked up only one thread from the fabric, it broke with the force of the needle being pushed through.  I didn't remember this being a problem last time I used it, but I think I must have attached the label with blanket stitch that time.  So there's a tip for you - don't bother trying to do invisible stitches on printable fabric.  It's not really worth the effort.

I had thought the quilt was going to end up way too large, but the finished size would fit nicely in the cot if you tucked the large borders down the sides and end of the cot.  It leaves just enough space at the top for a pillow, the same as how a regular quilt covers a bed.  Unfortunately this is not usually how you place a baby in a cot.  It will, however, be very useful to cover the bed once Abigail is a little older and we convert the cot into a toddler bed, and also as a lap quilt after that.  Until then I think it will be used as a floor mat for her to lie on.... and hopefully sit on soon!  It should fill in the gap nicely until she is ready for a big girl bed, and needs a big girl bed quilt, which I'm hoping will end up being the Birdie Stitches BOM I'm currently working on.

Now that this quilt is no longer on my to-do list, I've got a free space for something new!!  I've decided that I want to make my niece and nephew lap quilts for their birthdays this year (August and September).  They will be turning 10 and 7.  She LOVES puppies and the colour green, he LOVES dinosaurs but I'll have to check on his favourite colour.  These quilts are going to be mostly or all pieced with little or no applique, and I intend to follow someone else's pattern, so this *should* make then quicker and easier to finish.  Think I've found a pattern for the puppies, and bought some fabric online today that I just loved... but more on that later.... and I'd better get in and finish the music quilt first.

Back to the baby elephants... here it is in action being approved by it's new owner
..... and yes it has been sicked on already!  Only a little dribble though.

Friday, January 21, 2011

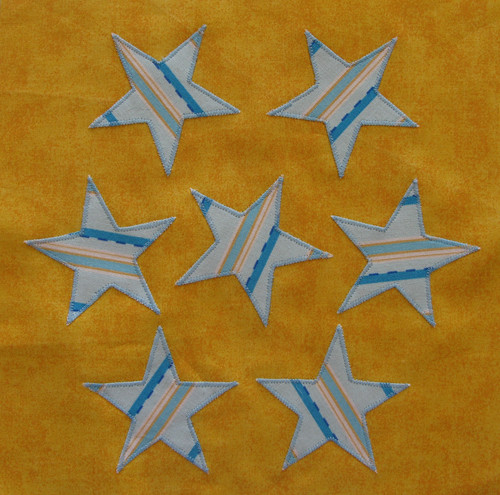
Civil War block 3: Seven Sisters

Here we are at week 3 and I'm still keeping up to date


Again this is fabric from my music quilt.  I think it's going to be interesting to see how many blocks get made from the same project and how different they end up looking.  This block bears no resemblence to the previous block, yet the fabric is sourced from the same original project.  I was going to applique the stars using trusty blanket stitch, but then realised what pointy points I'd have to do.  I think I still need more practice with blanket stitch around corners.  So I decided to use the zig-zag technique I'd learnt with the music quilt.  I'd got quite good at tight corners and tiny bits of fabric, and it was fresh in my mind.  Again I used a tear-away stabiliser behind the backing fabric and I think that is key to my success!  I had deliberately placed all the stars the same way on the fabric so that the stripes sort of radiate in all directions but in the end it is sort of lost because it's an irregular stripe pattern.  Now it just looks random, which is still good.  It can actually take a lot of planning to achieve a random look!

It's really interesting reading the story that goes along with the block each week.   I basically don't know anything about the American Civil War except that it was between the north and the south, and had something to do with slavery.  Oh, and I know what the fashion was at the time.  In high school we basically only learnt about Australian history. All my other history knowledge comes from when I studied costume, so mostly I just remember the fashions.

I like this way of learning history, in stories rather than 'facts'.  Facts (as you would get in a sterotypical history class) tell you what was going on, but the stories let you know more what it was like to be there at the time.

The Flickr group set up for the project also has a spot to list your blog, so I've been looking over some of the blogs of other people joining in.  Sooooo many other BOM projects I'd love to do.

I'm dearly tempted by:
Retro Nine Patch
Birdie Stitches
Friday Block Party

I sort of have in the back of my mind the thought that I could start it a bit later and catch up when I haven't got anything else on, but seriously, when is that going to happen??  The Friday Block Party could actually just be done as a block here and there since they don't specifically make up a finished design, so maybe I'll end up doing some of them along the way.  The other two and stitcheries and they take so much longer, but then again hand embroidery is rather relaxing to do, so maybe I should force myself to do one so I spend a bit more time sitting and relaxing in a spot other than in front of the computer!  Or course those two require me to buy more fabric for the embroidery backing, so they'll have to hold off till I have some spare cash anyway.

Thursday, January 20, 2011

Appliquing the Tuba

So my music quilt progresses.

The tuba became my arch nemesis in this project.  So many tiny holes to cut out with little pointy scissors


Then so many tiny holes to applique around!  But I got there in the end.

When I first started reading the instructions for this quilt and saw that it used zig-zag stitch for the applique, I cringed.  My memories of trying this method date back to the 90's where I always used the widest, shortest satin stitch to ensure maximum coverage of the raw edge.  I thought this was what you had to do.  It always ended up puckering the fabric and losing small details of the applique shape.  Plus if you made a mistake and hand to unpick you invariably ended up with a hole in your work.  Since discovering machine blanket stitch, I haven't used anything else for applique until now.

When I set in to actually do the work I read the instructions in more detail.  The zig-zag stitch suggested was not so much a satin stitch.  Stitch width was set at about 2 and length and 0.5 (my machine goes down to 0.2).  This provided a very neat stitch which finished the applique shapes nicely and from a short distance appears to cover the join entirely.

Using the method the pattern describes to pivot on corners and curves, I achieved a very tidy result!
For the strings on the violin and harp, I used stitch width 1 and length 0.4, which produced what appears to be a solid line.  I also used a tear-away stabiliser (in addition to the Applifix) when doing all the zig-zaging.  This stopped any puckering and made the whole job a lot easier.  It really is about using the right tools/products and putting the extra effort in to get the desired result.

I think my favourite of all the instruments at this stage is the violin.


I just love the result of the silver strings on the black neck and the purple edges look very neat.  I think I will
add zig-zag back into my skill set for doing applique.  I am also interested to try the raw edge technique used by Don't Look Now, but that will have to be another project for another time (maybe a suitable shopping list item for the next craft show...)

LinkWithin

Related Posts Plugin for WordPress, Blogger...