Showing posts with label tutorial. Show all posts

Monday, December 5, 2011

Quick Santa Sack - Tutorial

As promised, here is a tutorial for the Santa Sack I made on the weekend.
Mine came out about the size of a regular pillow case, but you can of course make it any size you want.  The sack has french seams so there are no raw edges and you don't need an overlocker/serger to create a nice finish.

It might seem like a lot of steps, but they're all very simple and quick.  All the images can be clicked to see a larger version.

Materials needed to make the same size as mine:
1/2 yard of main fabric
fat 1/4 of trim fabric

1.  Cut your half yard of fabric (if it isn't already cut) and trim the selvedges.  Lay it on the table folded in half with WRONG sides together.  In the photo below, the fold is on the left side and the edges where the selvedges were are on the right.

2. Cut two pieces of your trim fabric to be the same width as the main fabric and as deep as you'd like, plus 1" for seam allowance.  My rectangles were 18" x 6-1/2".

3. Sew the long side seams of your main fabric with a 1/4" seam.

4. Turn your sack inside out and push out your corners.  Press the seam flat ensuring the stitches are rolled out as far as they go. You should be able to see the stitches in between the two layers of fabric.

5. Stitch the side seam again, this time using a seam allowance large enough to enclose the previous seam allowance.  In my case this was 3/8" but you can make it bigger if you need.  Do not turn your bag inside out again.  It should now be right-side on the inside.

6. Join the two rectangles of your trim fabric together.  To work out the seam allowance you need to add together your seam allowance from step 3 and step 5, then add a tiny bit.  In my case this is 5/8" and I lined my fabric up just over the 5/8" mark on my machine to add the tiny bit.

7.  Press the seams open and press under 1/2" along the bottom edge.

8. Pin the trim fabric to the outside of the sack at the top.  This means that you are matching the RIGHT side of the trim fabric with the WRONG side of the sack.  Match up the side seams and pin in place then stitch around with a 1/2" seam allowance.

9. Pull up the trim fabric, and press the seam allowance down into your sack.

10. On what is currently the outside of the sack, do a row of understitching along the sack edge, close to the join with the trim fabric.  This should be sewn through all layers (including the seam allowance at the back).

11. Turn your sack out the right way and fold the trim fabric over the top.  Press well to make a neat edge.

12. Topstitch down the trim fabric along the bottom edge, close to the fold.  (I actually turned my sack inside-out again to do this step as I couldn't be bothered to set up the free-arm)

13. Give it all a good press, and you have a Santa Sack ready to be filled with surprises.

Let me know if you make one, I'd love to see the finished products!

Monday, October 3, 2011

Are your jeans too big in the waist?

I've decided I'm going to try for Blogtoberfest, so needed a blog post for today.

Today I adjusted some jeans to fit me and took photos so you can see how I did it.   Sort of a tutorial, but will only work for you if you have jeans that are too big in the waist and fit everywhere else.

My friend had bought a pair of not-cheap jeans online but when they arrived they were the wrong shape for her, so she gave them to me knowing I was short on nice clothes at the moment.  They're a size or two too big for me but they are the nicest denim I've felt for ages!

So I needed to make them tighter around the back of the waist.  I tried them on and held a piece of elastic across my back to see how much I needed.  I then took about an inch off this measurement to make it snug.

I marked on the jeans where I wanted to elastic to start and end.  I'd selected a point about halfway between the sideseam and the first belt loop around the back.  You can just see my white mark where the red arrow is pointing.

Then I cut open the inside of the waistband on the marks, and inserted one end of my piece of elastic by about an inch towards the front of the jeans.  I stitched the elastic  through all layers of the waistband about 1/2" to the left of the opening.

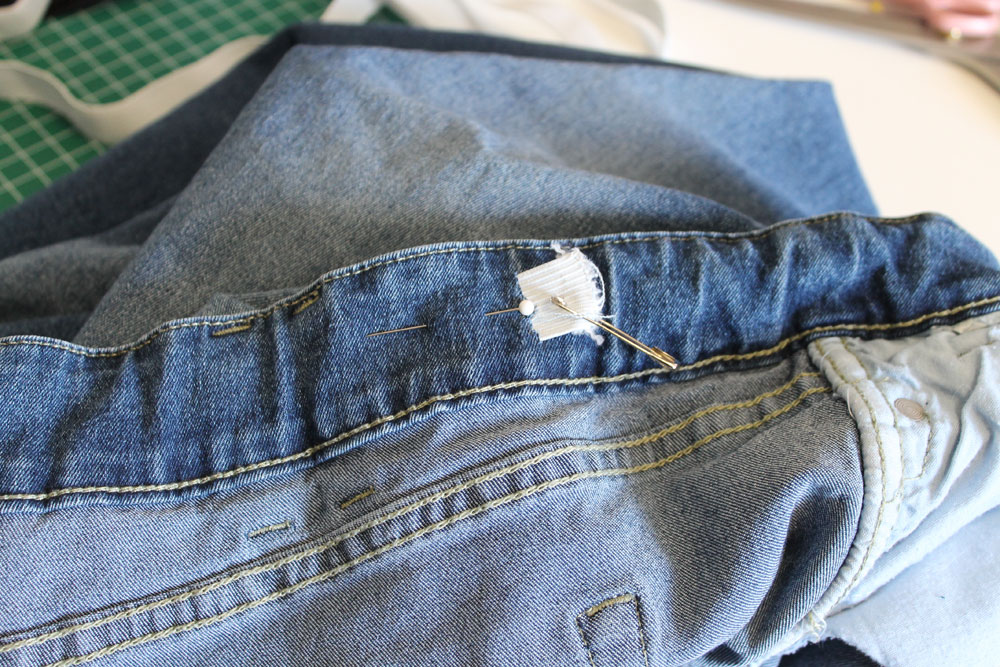
Next I threaded the elastic through the waistband, around the back of the jeans, and came out the hole on the other side.  I pinned the elastic to the waistband to the left of the opening (towards the back of the jeans).

Whilst the sewing pin was holding the elastic in place, I tucked the other end into the waistband through the opening and pushed it in towards the front of the jeans.  I have a really nice pair of bent nose tweezers which are good for this sort of thing.  Again I stitched about 1/2" past the cut opening, towards the front of the jeans to hold the elastic in place.

I then used a 3 stitch zig-zig to go over the cut openings and stop then from fraying.

Both lots of stitching can be seen from the outside of the waistband, but if the thread is colour matched well, you can hardly see it, and I'm unlikely to ever display the waistband of the jeans.  I'll usually have a top long enough to cover my waist, or I'll be wearing a belt over the jeans.

So there you have it, how to add elastic into the waist of your jeans.

Why don't you join us for Blogtoberfest? It's not too late to join, head over to Tinniegirl and sign up and start blogging. What? You don't have a blog? Then sign up!

Saturday, September 10, 2011

Mini Book Bag - Tutorial

Today I went to a 1st birthday party for one of the bub's in my mums' group and wanted to take a gift.  I hate giving "more toys" because most kids these days have too many.  I'd given books as a gift previously so wanted to do something a little different.  I decided on making a mini book bag.  It's not big enough to be a school library bag, but is great for toddlers small board books, and I'm sure it will get used for all sorts of other things too.
His mum loved it and was showing it around to everyone.  She even said to someone "did you see this?  Oh, you did... will here, see it again!"
It's a great little item that's quick and easy to make, and turns into a really special, personalised gift.

A note on size
There are three books in my bag, the largest is 6" x 7-1/2" and all the books together are 1" thick.  My finished bag is approximately 7-1/2" wide x 9" tall and the books just fit nicely.  You can make your bag any size you want depending on what size books you have.  Just cut your fabric 1" larger in both directions than your desired finished bag size.  If you make the bag wider you will also need to allow extra twill tape for the handles.  When considering size, don't forget to factor in the thickness of the books as well as the height and width.

What you'll need
2 rectangles of main fabric 8-1/2" x 10"
2 rectangles of lining fabric 8-1/2" x 10"
2 rectangles of batting  8-1/2" x 10"
2 pieces of 1" wide twill tape, each 12" long
Embroidered name panel (optional)
I made my name panel using the built-in fonts in my embroidery machine, and then trimmed the panel leaving 1/2" all around the name.  You could easily hand embroidery a panel, use fabric paint/pens/crayons or even screen printing.

Fold over 1/4" all around the name panel and press.  I like to add scraps of fusible web to the back (which I save specially) to help hold the piece in place when I'm sewing it down.

Position the name panel where you would like it and press it onto the bag front then sew close to the folded edge.

Lay out your fabrics in the following order from bottom to top (as shown in photograph):
Wadding
Bag back - right side up
Bag front - wrong side up
Wadding
Make sure all your fabrics align around the edges, I have just laid them out like this so you can see which layer goes where.

When all edges are matched up, sew down one long side, across the bottom and back up the other side with a 1/2" seam allowance.

Place your two lining pieces right sides together.  With a seam allowance slightly larger than 1/2", sew down one long side, across the bottom, then 1"-2" up the other side.  Reinforce your stitches (reverse) and then stop sewing.  Sew 1"-2" down from the top on that side, ensuring you reinforce at the edge of the opening. (Click on the image for a better view)

Trim the corners on your bag and lining pieces, ensuring you don't cut too close to your stitching.

Turn the bag (with wadding attached) right side out, but leave your lining as it is.  Pin your handles to the outside of the bag.  The handles should fall down the side of the bag which raw edges lined up to the raw edges of the bag (back handle is folded up for photo only).  I've placed my handles 1"-2" in from the side seams, you may need to adjust this measurement if you have changed the size of your bag.  Baste handles in place if you like to baste things (I just use pins)

Place the bag with the handles inside the lining.  Match up the side seams and pin in place.

Sew around the top edge with a 1/2" seam allowance, reversing over the handles to reinforce.

Trim the wadding from the seam allowance to reduce bulk

Pull the bag out through the opening in the lining, then push the lining into the bag (get it right down into the corners) and check the top edge.  If the lining rolls to the outside too much you can turn it all inside out again through the opening and increase the seam allowance along the bottom edge of the lining.  In my case, it was just right, the little bit of roll you see will be fixed with a good press.

Pull the lining out of the bag again and lay flat.  Press the seam allowance in the opening and make sure the two edges line up neatly.

Top stitch the opening close to the edge.  If you prefer a neater finish you can slip stitch the opening closed by hand.

Push the lining back into the bag, remembering to tuck the corners right down into the bottom.  Press the top edge neatly and fill with books!

Friday, August 5, 2011

Quilt Block Tutorial - Perspective

This block has been designed especially for Desperate Housewife’s Quilt-as-you-wish-Along


I have been wanting to design a quilt based on the works of M.C. Escher and his use of dark,light and shadow.  Whilst this block is nowhere near that end result, that was the starting point of my inspiration for this block.  Depending how you focus your eyes when you look at it, you can get the idea of a 3D shape with the dark patches being further away than the light patches.

The block is made out of 1" strips and 2-1/2" squares, so could be good for scraps but you'd have to have the right shades in your scrap bin.  This block requires very accurate cutting and sewing of the strips because, with so many seams, a slight variance in each seam adds up to a big difference in the overall finished size.


You will need:
4 shades of the same colour fabricbackground fabric

Cut:
4 rectangles of each colour 1"x8-1/2" (total of 16 rectangles)
8 squares 2-1/2"x2-1/2"

All images can be clicked for a larger view.
I am working with fat quarters so I have just cut strips off the fat quarter and will cut the rectangles down to size after I have sewn them.  In this case I need two strips of each colour.  If you are working with a full width of fabric you only need one strip of each colour.


Join the strips into pairs, the two lighter shades together and the two darker shades together


Now is a good time to check your seam allowances.  Your joined strips should measure 1-1/2" wide.  If they are too wide you can trim a little of each side.


Next, join the lighter pair to the darker pair, ensure that the lightest and darkest shades are on the outside.

Again check your width, it should be 2-1/2", but this time you have to be careful with just trimming the excess off, if it is too much your strips will be uneven.

Now it's time to cut your strips to length.  Cut a total of four rectangles 8-1/2" long.  (I have laid mine out with the dark shades in the centre as this is how they will be sewn together in the end)


Next, take your squares and draw diagonal lines through the centre of all of them (on the wrong side of the fabric)


Place the squares on the corners of the rectangles, ensuring that the diagonal lines point in towards the dark strip (see black lines added to below image, right hand side. Remember to click image if you want a larger view)


Sew ON the drawn line.  I have also sewn again 1/2" from the first sewing line so I can save my bonus half-square-triangle blocks for later.


Trim off the corner pieces 1/4" from the main sewing line (or in the middle of the two sewing lines if you have done this also)


Press the triangles out flat


Now sew the pairs together as they are on the mat, with the dark strips together.  Then sew the two pieces together for form the completed block


Here are some layout ideas for you
No rotation


Rotating alternate blocks
This rotating alternate block layout could give you some interesting effects if you used two different background fabrics.  Can you see the wrapped sweet/lolly/candy image?


Rotating alternate rows
** Please note, this design is for personal use only, it may not be reproduced or used commercially without prior written consent **

LinkWithin

Related Posts Plugin for WordPress, Blogger...