Saturday, December 31, 2011

Two birds with one stone (or needle?)

Thanks to my bright idea of moving my floor lamp into the front lounge room, I've been able to enjoy my recent habit of watching TV with hubby AND make progress on some of my hand sewing.  That's how I caught up with my hexagons the other week.

So the last few days I've been concentrating on my Birdie Stitches blocks.  I've now finished October and December.
I haven't done November as it is based around Thanksgiving, and being an Australian, this means nothing to me.  I've also rearranged the block order because a lot of them match up with the Northern Hemisphere seasons and I want them to match ours.  This means that my 'missing' month may not be November.  Hoping that I can work with hubby to design an extra block and then it will be all ready to put together.  I had decided that I wanted to finish these blocks (minus November) this year, and I put the star on the tree last night!

I'm not planning on starting any BOMs next year, but I have signed up for the Free Motion Quilt Challenge, which is a once a month task, so that should be enough to keep me busy.  I've still got all those Civil War blocks to catch up on too!!!

Last week I received my December hexies, I just kept forgetting to photograph them.  I love the cute little owls, and the sunflowers actually remind me of some underwear I used to own, would you believe!!  LOL

Tuesday, December 20, 2011

I'm not dead

I promise.

I just haven't done much crafting of late.  I seem to be spending my evenings sitting on the couch watching TV with my hubby.  Which is great for relaxation and togetherness, but not so good for sewing projects!

It does mean that I have managed to finish my overdue November hexies and December hexies for the Inchy Hexagon Flower Swap.  Here is a sneak peak since I know some of the recipients follow my blog.  Hopefully they will be in the post tomorrow.
I also received my November hexies but I forgot to take a photo of them tonight, so that gives me something else to do in the next few days!

This week I received my order of Woodland fabric by Natalie of Cinderberry Stitches.  I don't know what I'm going to do with it yet, but I love her work so much I just had to have some.

And I've done a little bit of cutting out of Civil War blocks.  Trying to catch up!

I don't really get a 'break' over Christmas so I can't say that I'll have more time to catch up, but here's hoping.


Monday, December 5, 2011

Quick Santa Sack - Tutorial

As promised, here is a tutorial for the Santa Sack I made on the weekend.
Mine came out about the size of a regular pillow case, but you can of course make it any size you want.  The sack has french seams so there are no raw edges and you don't need an overlocker/serger to create a nice finish.

It might seem like a lot of steps, but they're all very simple and quick.  All the images can be clicked to see a larger version.

Materials needed to make the same size as mine:
1/2 yard of main fabric
fat 1/4 of trim fabric

1.  Cut your half yard of fabric (if it isn't already cut) and trim the selvedges.  Lay it on the table folded in half with WRONG sides together.  In the photo below, the fold is on the left side and the edges where the selvedges were are on the right.

2. Cut two pieces of your trim fabric to be the same width as the main fabric and as deep as you'd like, plus 1" for seam allowance.  My rectangles were 18" x 6-1/2".

3. Sew the long side seams of your main fabric with a 1/4" seam.

4. Turn your sack inside out and push out your corners.  Press the seam flat ensuring the stitches are rolled out as far as they go. You should be able to see the stitches in between the two layers of fabric.

5. Stitch the side seam again, this time using a seam allowance large enough to enclose the previous seam allowance.  In my case this was 3/8" but you can make it bigger if you need.  Do not turn your bag inside out again.  It should now be right-side on the inside.

6. Join the two rectangles of your trim fabric together.  To work out the seam allowance you need to add together your seam allowance from step 3 and step 5, then add a tiny bit.  In my case this is 5/8" and I lined my fabric up just over the 5/8" mark on my machine to add the tiny bit.

7.  Press the seams open and press under 1/2" along the bottom edge.

8. Pin the trim fabric to the outside of the sack at the top.  This means that you are matching the RIGHT side of the trim fabric with the WRONG side of the sack.  Match up the side seams and pin in place then stitch around with a 1/2" seam allowance.

9. Pull up the trim fabric, and press the seam allowance down into your sack.

10. On what is currently the outside of the sack, do a row of understitching along the sack edge, close to the join with the trim fabric.  This should be sewn through all layers (including the seam allowance at the back).

11. Turn your sack out the right way and fold the trim fabric over the top.  Press well to make a neat edge.

12. Topstitch down the trim fabric along the bottom edge, close to the fold.  (I actually turned my sack inside-out again to do this step as I couldn't be bothered to set up the free-arm)

13. Give it all a good press, and you have a Santa Sack ready to be filled with surprises.

Let me know if you make one, I'd love to see the finished products!

Finally some Christmas sewing

Following on from my November Challenge.... I did none of the things on my list last month.  You may have noticed that I didn't even bother setting a December Challenge.  Well this weekend I found a small hint of my sewing mojo and made the santa sack I've been wanting to do for my daughter.
It's about the size of a regular pillow slip, uses half a yard of fabric plus a fat quarter and was made up one night after dinner.

I had originally thought about putting her name on it but then decided I didn't want to spend the time at the moment.  To save confusion with later children, I'll just make them in different colours.

Stay tuned for a tutorial on how to make one, hopefully I'll post it this evening.

Saturday, December 3, 2011

Window Dressing

I think my sewing mojo is starting to return, slowly. I've had some design ideas lately, and that motivates me to finish jobs in progress so I can start on something new. Not that I always finish one project before starting something new... more like I can only have so many projects on the go at once so I have to finish at least one before I can start another. Anyway.... today I finally got around to hemming the curtains in the nursery.

I made the curtains about a year ago and hung them up to see how they looked, and to make sure they dropped before I hemmed them.  My curtain making book says to hang them for a week, but I thought I'd leave them a little longer just to make sure.  Well that's my excuse and I'm sticking to it.

I had run into some trouble though, which held up the process a little.  I've added a separate lining to the curtains, even though the fabric is backed.  This is a westerly facing window and so will get the direct afternoon sun.  I don't want the room to heat up too much in the summer since bub has to sleep there, and especially considering that she goes to bed before the sun goes down.  My first attempt at adding the lining didn't sit very well.  I'd tried to make the lining the width of the window (like I'd seen a picture in my book) but it never really worked, it pulled away at the sides etc.  So I re-did the lining with 1 1/2 times the width of the window.  It seems to work much better now.  The curtains themselves are about 2 1/2 times the width.

I might head into the sewing room now and see what else I can find some of my missing mojo.

Friday, December 2, 2011

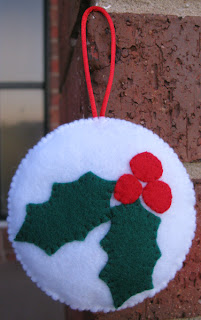
Free Pattern - Christmas Decoration 6 - Angel

Number 6 you ask?  Back in 2009 when I first started my blog, I published some free patterns for Christmas decorations.  I was going to do one a week till Christmas but somehow the last one never got finished, so here it is!


And since most of you weren't around when I put up the original patterns, here are links for the rest of them:


Tuesday, November 29, 2011

Have you seen my mojo?

My sewing mojo that is.  I seem to have lost it.

I'm waiting on fabric to continue with my Terrain project and that seems to have slowed me down.  I have so many other things I could be doing but the motivation just isn't there.  I haven't even started my Christmas sewing, so I wont be meeting my November Challenge.

I was even going to do another giveaway this week but completely forgot till this morning.  I guess I'll just save that for another time.  And from the last few giveaways I have so many new followers, and now I haven't given them anything to read.  So welcome new followers, I'm sure things will pick up soon.

Please stay tuned as there are some great things to come, just not this week probably.

Thursday, November 24, 2011

Carolina has redeemed herself

32 Carolina Lily
After trimming her down a bit I could had the last pieces more accurately, although I've just realised that the top point of the petal is chopped off, but oh, well, there are worse things that can happen.

Guess I have to have another cutting session for my Civil War blocks now because I've sewn everything I had cut out already.

Wednesday, November 23, 2011

The Civil War in my sewing room

I've fallen very behind in my civil war blocks.  I blame Carolina... she started it!

I cut this block out and started to put it together, only to discover that I'd cut some pieces too big.  So I trimmed them down and continued sewing... to find out that only one of my pieces had been too big, so now one was too small.  She got thrown onto my sewing table in disgust, waiting for me to cut a new piece.

A little while ago, I decided to have another cutting session of my blocks.  Get them all cut out and then when I felt like sewing but didn't know what to do, I could put them together.  That was until I got to Ohio Star, and cut the pieces wrong.  Since I was using left over charm squares, I didn't have enough fabric to just cut new pieces.  Again my blocks were thrown to the corner of the table and left for another day.

Last night became that day....

33 Indiana Puzzle
The fabric selection for this one is just some fabrics which I ordered that week.  Obviously I hadn't done any sewing.  I could have done the curved seams a bit better, but I was being lazy.  I just matched up the starting point, matched up the end point and sort of pushed it into shape in between, no pins.  Didn't come out too badly I don't think.

34 Rosebud
Fabric selection for this week was mostly Block Lotto batik fabrics.

35 Star of the West
This week's fabrics are what I used to make the mini book bag, which was left overs from a few years ago where I had made a bag for my nephew to keep some of his matchbox cars in.

36 Kentucky Crossroads
I love this block.  The fabrics are ones I used for Clucky, and it's interesting the different feel you get when the fabrics are used in different ratios.  The red and yellow were very small parts of Clucky, but in this block they are the main fabrics.

37... I'll get back to you on this one

38 Ohio Star
This was the other fated block.  The fabric selection is left overs from my Scary Squares table topper, and I cut the pieces for the hourglass blocks to small.  At first I didn't know what to do, but then I decided to add borders to the blocks to make them the correct size.  My first thought had of course been to use black, but I like how the coloured borders came out better.  It does change the shape of the star somewhat but that's how new blocks are born!

And what of the fated 32 Carolina Lily?  After sewing on one of the last side pieces, I discovered that the block has warped a little and should have been trimmed down before adding that piece.  So it needs some unpicking, which I wasn't up to at 10:30 last night.

So that brings me up to about September somewhere, only about two and a half months behind....

Monday, November 21, 2011

Waistcoats and Spangles

Wedding month is officially over.  I was bridesmaid for my best friend a week and a half ago, and then had another wedding this weekend just gone, which had almost the same groomsmen as the first one!  I guess that's what happens in a close circle of friends.

The dress I had planned to wear this weekend was one I bought just after I had my baby and, whilst I did like it, was very much of an 'it will do' choice as it was the only thing available in my size and budget.  At the last minute I decided I wanted to buy a new dress.  The two friends of mine who were also going to the wedding both had new dresses.

So Saturday a week ago I went shopping, but was again faced with a limited selection in my size and price range.  In the end I found a dress at Myer, who happened to be having a 40% off sale.  It looked similar to this, but had a plain strap on the other shoulder and was in hot pink not red (I forgot to take a 'before' photo)
I wanted the dress to be 'spangly' because my friend was having a very sparkly dress, so I set to work adding beads and crystals.  I also took the flowers off the shoulder strap (but left the ruffle).  I added one of the flowers back to the other strap because it looked a little plain.

And this is how the top of my dressed ended up
It made the dress something special and I'm rather pleased with the results.  There is a combination of crystals, seed beads and sequins in there.

Hubby also decided that he wanted a waistcoat for the event, so a rush shopping trip on Monday night and every spare minute that I wasn't beading went into making this:

I think I need to make him more waistcoats now!  I was aiming for a satin brocade but we couldn't find any so we ended up with a quilting cotton.  Next time I'll have to back the fabric with something because it's a bit thin and shows the facing inside, but altogether not bad for a rush job that included fitting adjustments.

Now I can get back to my regular sewing and maybe try to do some of my Christmas tasks.....


Round Tuit Giveaway

Jill over at Creating My Way to Success is having her weekly Round Tuit and a giveaway of my patterns!

Tuits are very hard to come by, especially the round ones. For years people have been saying, "I'll do it as soon as I get a round tuit". Well now you can have one of your very own, and all those jobs that have needed doing will finally get done!

Head over to Creating My Way to Success and link up your projects - old or new - just share your creativity or inspiration.

While you're at it follow the directions to enter the giveaway and you could win a copy of my latest pattern, plus a Lily & Will II charm pack to get your started on it, AND any other pattern from my Etsy store that you like.

There is also a discount code for there if you wish to buy anything from my shop between now and Christmas.  So head on over now and join in the fun.


Thursday, November 17, 2011

I need a montage

[insert Eye of the Tiger or other motivational soundtrack here]

I'm adding spangles to a new dress for a wedding this weekend

I'm making a waistcoat for my husband for the same wedding

I'm making blocks for my next quilt pattern

Somewhere in the last week or two I received by October hexies for the Inchy Hexagon Flower Swap

(I need to work on my November hexies too)

My latest Monthly Solids stack arrived yesterday


I haven't even started my Christmas sewing for this month's challenge.

I was going to have another giveaway this week but somehow it's now Thursday and I haven't even thought about it!  You'll just have to wait till Monday when there will be a giveaway of my patterns over at Creating My Way to Success.

And since I haven't had as much time lately because of my friend's wedding last weekend.... here is a photo of me and my other half at the wedding.


Sunday, November 13, 2011

The dust is beginning to settle

I had my friend's hen's party a few weeks ago, and this Friday was her wedding.  Being bridesmaid I had things to do and organise and make sure I was at places on time  Sometimes it felt like this wedding was more stress than my own!  But it's over now, my friend is happy, and I can get on with my life.

Which leads me to the fact that I'm a day overdue for announcing the winner of my giveaway.

I loved reading about all your favourite old TV shows.  It also showed me what a broad age/generation range I have in my followers.  I was reminded of some of my other favourites too such as The Smurfs, The Raggy Dolls, SuperTed (and Spotty!), and of course The Muppets.  I'm now interested to see Bagpuss which Jill listed as her favourite.  I googled it and it's a pink cat!  Quite a few of you liked The Brady Bunch, I Love Lucy and Bonanza!

But I know you're all just waiting to find out the winner, so.....

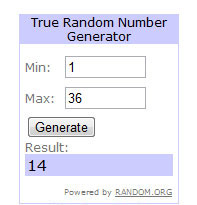
There is only 36 because someone commented twice and I only counted that as one entry.  It appears that Vesuviusmama, who loved Grizzly Adams, is the winner. Please email me (follow the link on my profile page) and let me know where to send your goodies, and just confirm if you are a follower or not (I can't see you in my list of followers).

Hoping for another giveaway this week, but all I seem to be posting at the moment is giveaways so I'll try for some real content too!

Also, I'm still waiting to hear from Anette J to claim her prize from last week.  Please send me an email.

Thursday, November 10, 2011

Terrain Triangles

I'm busy making half square triangles ready for my next project.

These will eventually become pinwheels and then have more added to them.  I'm rather excited about how this is shaping up!

Sadly, however... I have to buy more fabric.... oh dear, what a shame!  Some of the solids I was going to use from my stash had already been cut into (and I'd forgotten) so I don't have enough of them.

Off to order more fabric.....


LinkWithin

Related Posts Plugin for WordPress, Blogger...