Showing posts with label christmas. Show all posts

Monday, December 5, 2011

Quick Santa Sack - Tutorial

As promised, here is a tutorial for the Santa Sack I made on the weekend.
Mine came out about the size of a regular pillow case, but you can of course make it any size you want.  The sack has french seams so there are no raw edges and you don't need an overlocker/serger to create a nice finish.

It might seem like a lot of steps, but they're all very simple and quick.  All the images can be clicked to see a larger version.

Materials needed to make the same size as mine:
1/2 yard of main fabric
fat 1/4 of trim fabric

1.  Cut your half yard of fabric (if it isn't already cut) and trim the selvedges.  Lay it on the table folded in half with WRONG sides together.  In the photo below, the fold is on the left side and the edges where the selvedges were are on the right.

2. Cut two pieces of your trim fabric to be the same width as the main fabric and as deep as you'd like, plus 1" for seam allowance.  My rectangles were 18" x 6-1/2".

3. Sew the long side seams of your main fabric with a 1/4" seam.

4. Turn your sack inside out and push out your corners.  Press the seam flat ensuring the stitches are rolled out as far as they go. You should be able to see the stitches in between the two layers of fabric.

5. Stitch the side seam again, this time using a seam allowance large enough to enclose the previous seam allowance.  In my case this was 3/8" but you can make it bigger if you need.  Do not turn your bag inside out again.  It should now be right-side on the inside.

6. Join the two rectangles of your trim fabric together.  To work out the seam allowance you need to add together your seam allowance from step 3 and step 5, then add a tiny bit.  In my case this is 5/8" and I lined my fabric up just over the 5/8" mark on my machine to add the tiny bit.

7.  Press the seams open and press under 1/2" along the bottom edge.

8. Pin the trim fabric to the outside of the sack at the top.  This means that you are matching the RIGHT side of the trim fabric with the WRONG side of the sack.  Match up the side seams and pin in place then stitch around with a 1/2" seam allowance.

9. Pull up the trim fabric, and press the seam allowance down into your sack.

10. On what is currently the outside of the sack, do a row of understitching along the sack edge, close to the join with the trim fabric.  This should be sewn through all layers (including the seam allowance at the back).

11. Turn your sack out the right way and fold the trim fabric over the top.  Press well to make a neat edge.

12. Topstitch down the trim fabric along the bottom edge, close to the fold.  (I actually turned my sack inside-out again to do this step as I couldn't be bothered to set up the free-arm)

13. Give it all a good press, and you have a Santa Sack ready to be filled with surprises.

Let me know if you make one, I'd love to see the finished products!

Finally some Christmas sewing

Following on from my November Challenge.... I did none of the things on my list last month.  You may have noticed that I didn't even bother setting a December Challenge.  Well this weekend I found a small hint of my sewing mojo and made the santa sack I've been wanting to do for my daughter.
It's about the size of a regular pillow slip, uses half a yard of fabric plus a fat quarter and was made up one night after dinner.

I had originally thought about putting her name on it but then decided I didn't want to spend the time at the moment.  To save confusion with later children, I'll just make them in different colours.

Stay tuned for a tutorial on how to make one, hopefully I'll post it this evening.

Friday, December 2, 2011

Free Pattern - Christmas Decoration 6 - Angel

Number 6 you ask?  Back in 2009 when I first started my blog, I published some free patterns for Christmas decorations.  I was going to do one a week till Christmas but somehow the last one never got finished, so here it is!


And since most of you weren't around when I put up the original patterns, here are links for the rest of them:


Wednesday, February 9, 2011

Fabric Delivery

I know I have too much fabric already, but I keep buying more.  My latest excuse is that most of my stash is dressmaking fabrics, and now I'm getting into quilting.

Recently I've purchased the following:

 From Aunt Beas Fabric (now closed) I got a fat quarter pack of It's a Hoot by Momo for Moda

The pack didn't include a full variety of the range, but it's a very usable selection.  I'd been thinking about buying a charm square of the range so I'd get all the prints, but then you lose some of the graphics when you go to such small pieces.  I have plenty of charm packs and jelly rolls in my stash at the moment, so this will give me a challenge to make something out of a fat quarter pack instead.


From Blueberries I got this selection of 12 Days of Christmas fabrics also by Moda.  I had hoped to get the red swirly pattern too but they had sold out (the disadvantage to getting things in the 'specials' bin).  There is still some of this range available around the place so maybe I should hunt up some more.  There is also a version of the ice skaters with more green in the background that I wouldn't mind.

I've made a prototype Christmas decoration out of it so far... but more on that later!

Also from Blueberries, I got these flannels from the Bouncing Baby range.  I haven't made a quilt with flannel before so I thought I'd buy a little bit and have a play.  I'm also conscious of the fact that I buy lots of pretty girly fabric and not much that's suitable for boys, so when selecting this fabric I deliberately chose designs which could be boyish, or at least unisex.

When buying fabric from a range like this, I've always had the problem that I think I don't like some of the fabrics.  I felt I had to LOVE a fabric in order to buy it, so looking at a jelly roll (or similar), there are lots of fabrics that I don't completely and utterly love so I wouldn't buy it.

I've been trying to look past that now, and buy fabrics that blend and work together even if I don't love them.  After all, if I loved all the fabrics in a quilt I'd never see any of them.  Sometimes you need the more subtle, or 'boring' fabrics to bring out the beauty of the amazing ones.  I hope that I'm now achieving a more balanced selection in my stash.  I can't wait to see what I come up with to make use of all this!  But isn't that half the fun of having a fabric stash, dreaming of the potential?

Monday, December 21, 2009

More presents

Christmas appears to be here.  My parents have arrived and my brother (and family) is coming in a few days.

I've made fruit mince tarts, and even put kitties on a few of them.


The house  is becoming more of a home, and the carpet is due for tomorrow so then we can finally unpack everything (once christmas is over of course).

On the craft front, I've finished another Christmas present.

A few years ago I made The Best Library Bag Ever (tm) for my niece who was starting school


Next year my nephew is starting school so of course I had to make him a library bag too.  It had to be cool like hers, but different.  So I present to you The Best Library Bag Ever II.


The books with titles were machine embroidered.  The green one on an angle was supposed to be Where the  Wild Things Are, but the embroidery was too long for the book unfortunately.  The back of the bag is the woodgrain fabric which adds to the bookcase feel of it.  It's padded to protect the books inside and I've quilted around all the books and around the inside edges of the shelves.  I hope he likes it.

And yes, I'm overdue for my last Christmas decoration pattern.  The scanner wasn't working when I tried so I shall try and remedy that tonight.

Sunday, December 13, 2009

Free Pattern - Christmas Decoration 5 - Tree

Second last one. I think this is my favourite of all of them.  It's actually quite sparkly when the light catches it on the right angle.


Click here for the pattern (pdf)

And next Sunday we'll top them all off with an Angel.

Thursday, December 10, 2009

Free Pattern - Christmas Decoration 4 - Bells

And this brings me all up to date!


Click here for the pattern (pdf)

Also, I've finished another Christmas present and started on the next two... more info soon!

Tuesday, December 8, 2009

Free Pattern - Christmas Decoration 3 - Candle

As promised, here is the next one


Click here for the pattern (pdf)

In house news, we had the new washing machine delivered today, and the dishwasher is due this afternoon. There is a "towel carpet" between the family room and the bedroom so as not to get my feet comletely covered in concrete dust. The fencing and the driveway are due later this week

I've done some more embroidery today as well so I'll have that so share soon.

Sunday, November 22, 2009

Free Pattern - Christmas Decoration 2 - Gingerbread Man

One week closer to Christmas, and here is my next free pattern for a decoration.


Click here for the pattern (pdf)

I've cut out the rest of the decorations today, for the next four weeks.  I'm rather excited about them.  They are so simple yet there is so much room for creativity.

I'll be donating all the finished decorations to the Amitie Charity Challenge on Monday 30th November.  Guess this means that I have to have them all finished and photographed next weekend so I can donate them, and then get the patterns online afterwards.

Wednesday, November 18, 2009

Charity Chrismtas Challenge

Thanks to the link from Audrey and Maude  I will be attending the Amitie Christmas Charity Challenge

Now I just have to get busy making some more decorations!!

Sunday, November 15, 2009

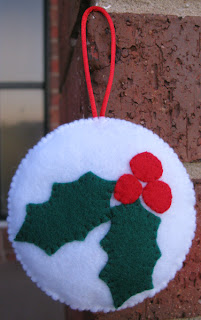
Free Pattern - Christmas Decoration 1 - Holly

Finally I have fought technology into submission and managed to put together the pattern I wanted to share.  It is for a felt christmas decoration.


I intend to do one every weekend until Christmas.

Click here for the pattern (pdf)

In other craft news I have finished one christmas present and am close to finishing a second (just a small amount of hand sewing to do).  Unfortunately I don't feel safe posting pictures as the recipents might find them!  I will have lots to share after christmas.

LinkWithin

Related Posts Plugin for WordPress, Blogger...