Tuesday, August 30, 2011

Crossing things off my list

At the beginning of the month I made a list of things to catch up on.  And this is where I'm up to:

The pattern that was supposed to be finished at the end of July is all done!  (but it's a surprise still)

My Retro Nine Patch quilt is finished in time for Lyn's showcase.  She said we can post pictures if we want, but I think I'll wait till then to show you all.  In the mean time, here is a silly sneak peek.  Since it is destined to be a doll quilt for my daughter I figured I'd better try it out with a doll!

My hexagons for August have been posted off and here are my September ones ready to go sometime next week.

My Block Lotto is all up to date, I even remembered to email my sneak peek block pictures to Sophie (but obviously I can't show you yet...)

I'm still a bit behind with the Civil War blocks, but since I've made five blocks this month I'm not so far behind as I was before.

I've finished another whole Birdie Stitches block.  For the sunflower centre and the birdie chest I decided to use a lattice stitch I'd seen in a magazine a few months ago.  You make really long straight stitches across the whole area, and then do tiny cross stitches over all the intersections.  I love the effect it gives, seems to jump out at you more than back-stitch does.  I think I'll try and use this stitch again some time.  I might have to design an embroidery pattern specially!
That leaves just one more Birdie Stitches block to finish in order to be up to date, and I'm halfway through that already.  Can I finish it in two days?

And lastly was my Wee Folk quilt, which I posted about earlier in the month, but here is another photo just because.
This is now hanging on the back of a chair in my sewing room because it doesn't have an end purpose.  I have a feeling I'm going to end up with a room full of things hanging over the backs of chairs!

Saturday, August 27, 2011

Does my bum look cute in this?

In amongst my weeks of not doing much sewing, I did manage to make a 'modern cloth nappy'.  I've had the fabric for ages (since before she was born) but only recently got around to sewing.  I'm a little ashamed to admit that we've been using disposables for most of her life, especially after spending several hundred dollars on 'cloth nappy systems'....but we're less than halfway through her nappy wearing life so if I can start changing over now, it will still make a difference to the world.  And hopefully by next baby I'll be all organised and not have to use disposables at all (well at least not much).

I used the Wee Weka pattern with gussets, which you can find here.  The fabric packs that I had bought weren't designed for gussets, so I didn't have enough elastic to go across the front, but it works for now, and I'm still experimenting.  I didn't make the pocket at the back, I just closed the whole thing up as if I was making a nappy cover.  Some of the nappies I've bought previously are an "all-in-two" system from The Green Nappy Co, which is like a pocket, but without the pocket.  You just lay the insert into the nappy instead of stuffing it into a pocket, so this is what I am doing with these.

So far it's been worn once and washed, but I need to make more (and more inserts) so they can become more full time.

Wednesday, August 24, 2011

Pattern tester anyone?

Have you ever been a pattern tester?

Have you used a pattern tester?

What are the expectations from both parties?

Would you be interested in being a pattern tester for me?

Saturday, August 20, 2011

Forgive me followers

for I have sinned... it has been 7 days since my last blog post!  It feels like an eternity.

Not much has been happening here on the sewing front because I've had a rather sooky bub this week. I think her top teeth might be coming through.

I did spend some time in the garden today though, so I'll report on 'crafting' of a different sort ;)

We planted out our very first tree/plant in the backyard, a Japanese Maple
Our backyard will be a bit of a slow process as my husband and I want to do it together ourselves, and we're still not sure exactly what we want to do with it.  That's why all the plants are still in pots... until today that is!

Last weekend my husband built the first of my two vege boxes
It's filled so far with regular top soil.  Hopefully tomorrow we'll buy mulch, fertiliser, etc to provide the best growing environment for my plants.  I have some asparagus and raspberries waiting to go in here.  Obviously there is room for lots more but I have to decide what yet.

In the front garden, my first daffodils bloomed this week

My snowdrops have been out and having fun for a while

The ranuculus have been looking beautiful for a while too, although I'm expecting some other colours as well

And my red hot poker is just poking out everywhere!  I've counted 15 flower heads so far

I've nearly finished a Birdie Stitches block, so I should have some craft news for you soon.

Saturday, August 13, 2011

I'm a Desperate Housewife

I finally got around to making some of the other blocks from the Desperate Housewife's Quilt-as-you-wish-along.

The first is 'Evolution' by Jane
The pinwheels are actually blue and pink (not red), my screen doesn't show up the colour very well.

The second is 'Quasar' by Wedding Dress Blue
I really love how both these blocks turned out, and they look even better in the photo, I guess because you have that effect of standing back and seeing them rather than the close up view.  I love the Quasar one so much I'd like to make more of them in the same colours, but all the fabrics came from my scrap bin so I might not be able to get all of them the same.

I've also been working on catching up my Civil War blocks
27 Irish Chain
Fabrics for this one are the Baby Hand Print mini quilt I made, and the fabric I used for the labels on the kids puppy/dino quilts

28 Next Door Neighbor
The background star fabric is left over from my husband's coffee quilt, which I used again the other week to line the wallet I made for his Tablet PC (which is still a work in progress because the design brief changed after I thought I'd finished it!).  The purple, pinky/orange and light green are all from hexies I made, and the darker green is some of the fabric I received from my Mug Rug Swap Adventure II partner.

29 Railroad Crossing
All these fabrics come from my Desperate Housewife's quilt block 'Perspective'.  The background is very dark purple, even though it appears almost black here.  I really love how this block turned out.

30 Peterson's Stars & Stripes
Luckily enough, this week I had red and blue fabrics to choose from to get the American flag effect which is the point of this block.  The red and yellow strips are fabrics I bought at the recent craft show and the blue is the binding off my dinosaur quilt.

31 Empty Spools
Fabrics for this are the backing from my Wee Folks quilt and one of the yellows I used in my block lotto blocks this month.  I cut the fabric really carefully to line up the stripes but then forgot about the seam allowances, so they didn't match up after all.  I don't really like how the block came out at all.  I might get around to redoing later.  Or maybe I wont.

And my final catch up item for tonight is Birdie Stitches.  This is actually the July block, I've skipped over June for the moment, and am now working on August, which is progressing rather quickly thanks to a sooky baby who wants me to sit in the lounge near her while she plays!

I feel so much better after having caught up on all these blocks.  I'm now only one week behind on Civil War blocks by my standards, and my outstanding Birdie Stitches are now down to 1-1/2 from 2-1/2.  Another few things to cross off my August to-do list.

Friday, August 12, 2011

This week I'm grateful for..... Scheduled Posts!

On Friday morning last week, I was due to  post up my block as part of Jane's Desperate Housewife's Quilt.  Luckily due to having to coordinate with Jane for links etc, the post had to be scheduled ahead of time.

Very good thing because Friday morning I woke up and turned my computer on to make sure the post had gone ahead as planned..... and my laptop had gone to the great LAN party in the sky.  He'd been acting a bit sick all week but Friday I was just unable to get him to turn on properly.

I've also been without my recently inherited netbook (from my hubby) because we're waiting on a new power cable which has been ordered.  My lovely hubby left his new tablet at home for me that day so I could make some contact with the outside world, but it just wasn't the same.

I'm also grateful that we're in a financial position which allowed me to go shopping on Saturday and buy a new laptop which was better than my old one.  I'd been looking for an excuse to upgrade but really couldn't justify it.  Had my laptop heard me and helped my cause?  I'll never know.

So only two days without a computer and now I'm getting used to a bigger (and higher resolution) screen and a wizz-bang new operating system (Windows7).  There's lots in there to be grateful for!

What are you grateful for this week?  Join in the fun over at Maxabella Loves

Thursday, August 11, 2011

Block lotto and hexies

Been doing a little bit of stuff to catch up recently, including getting some blocks done for this month's Block Lotto:

And my August hexie flowers for the Inchy Hexagon Flower Swap

I also finished the '1/2' Birdie Stitches block (1/2 because I already had it half done when I wrote my to-do list), but I have to press it and take photos yet.

So that's one, and two half things off my to-do list for August.  Not doing too bad.  I also have a few more Civil War blocks cut out, and one of the Desperate Housewife's blocks (which I forgot to include in my to-do list).

Just got enough time before bed tonight to do a few more things in the sewing room....

Monday, August 8, 2011

Wee Folk Quilt Finished

Finally!  Remember how I finished the top all the way back in May?  Well now it's all complete.
I know it was on the bottom of my to-do list, but somehow it got finished first.  I knew what I wanted to do and I had the right colour thread so I went and did it.

I took a leaf out of Red Pepper Quilt's book and went with a striped binding and simple straight line quilting.

I also used the striped fabric for the backing.

Don't forget you can download my free embroidery patterns for this quilt on my Free Patterns/Tutorials page (link at the top of my blog)

Friday, August 5, 2011

Quilt Block Tutorial - Perspective

This block has been designed especially for Desperate Housewife’s Quilt-as-you-wish-Along


I have been wanting to design a quilt based on the works of M.C. Escher and his use of dark,light and shadow.  Whilst this block is nowhere near that end result, that was the starting point of my inspiration for this block.  Depending how you focus your eyes when you look at it, you can get the idea of a 3D shape with the dark patches being further away than the light patches.

The block is made out of 1" strips and 2-1/2" squares, so could be good for scraps but you'd have to have the right shades in your scrap bin.  This block requires very accurate cutting and sewing of the strips because, with so many seams, a slight variance in each seam adds up to a big difference in the overall finished size.


You will need:
4 shades of the same colour fabricbackground fabric

Cut:
4 rectangles of each colour 1"x8-1/2" (total of 16 rectangles)
8 squares 2-1/2"x2-1/2"

All images can be clicked for a larger view.
I am working with fat quarters so I have just cut strips off the fat quarter and will cut the rectangles down to size after I have sewn them.  In this case I need two strips of each colour.  If you are working with a full width of fabric you only need one strip of each colour.


Join the strips into pairs, the two lighter shades together and the two darker shades together


Now is a good time to check your seam allowances.  Your joined strips should measure 1-1/2" wide.  If they are too wide you can trim a little of each side.


Next, join the lighter pair to the darker pair, ensure that the lightest and darkest shades are on the outside.

Again check your width, it should be 2-1/2", but this time you have to be careful with just trimming the excess off, if it is too much your strips will be uneven.

Now it's time to cut your strips to length.  Cut a total of four rectangles 8-1/2" long.  (I have laid mine out with the dark shades in the centre as this is how they will be sewn together in the end)


Next, take your squares and draw diagonal lines through the centre of all of them (on the wrong side of the fabric)


Place the squares on the corners of the rectangles, ensuring that the diagonal lines point in towards the dark strip (see black lines added to below image, right hand side. Remember to click image if you want a larger view)


Sew ON the drawn line.  I have also sewn again 1/2" from the first sewing line so I can save my bonus half-square-triangle blocks for later.


Trim off the corner pieces 1/4" from the main sewing line (or in the middle of the two sewing lines if you have done this also)


Press the triangles out flat


Now sew the pairs together as they are on the mat, with the dark strips together.  Then sew the two pieces together for form the completed block


Here are some layout ideas for you
No rotation


Rotating alternate blocks
This rotating alternate block layout could give you some interesting effects if you used two different background fabrics.  Can you see the wrapped sweet/lolly/candy image?


Rotating alternate rows
** Please note, this design is for personal use only, it may not be reproduced or used commercially without prior written consent **

Wednesday, August 3, 2011

Take-away Menu Holder

I recently made a take-away menu holder to help keep the kitchen tidy and I thought I'd share it with you in the form of a tutorial.

What you'll need

  • Main fabric - one fat quarter
  • Medium to heavy weight iron on interfacing 7-1/2"x9-1/2"
  • Binding fabric - 2"x15" for pockets, 2"x35" for outside edge
  • Matching sewing thread
  • Magnetic paper  - 6-1/2"x8-1/2"

This will make a menu holder large enough to hold A5 size menus (approx 6"x8-1/2").  Ours holds about 9 menus all together and holds comfortably on the fridge.

Cut 3 rectangles of fabric 7-1/2"x9-1/2", cut one rectangle of interfacing the same size

Cut one of these rectangles of fabric into two, 7-1/2"x6-1/2" and 7-1/2"x3".  These are your front pockets.

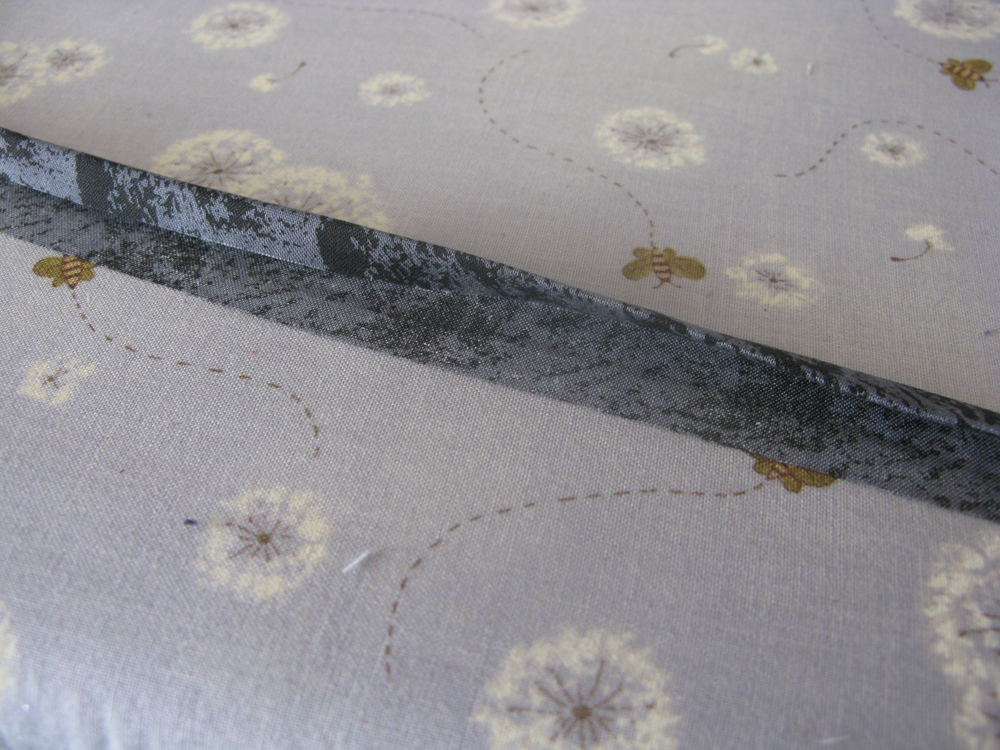
Cut 2 strips of binding fabric 2"x7-1/2" long each.  Press the long sides into the centre, wrong sides together, creating a single fold binding (use a bias tape maker if you have one) and then press in half.

Unfold and attach one side to the WRONG side of your pocket pieces.  Ensure you are attaching it to the top edge of the pocket.  (I didn't cut my binding to length until after I attached it).

Press the binding over to the right side and top stitch down.

Lay out your fabric on top of each other in this order (bottom to top):
  1. Rectangle without interfacing, wrong side up
  2. Rectangle with interfacing, right side up
  3. Large front pocket, right side up
  4. Small front pocket, right side up
    Ensure that all layers line up along the bottom edge/corners
    (ignore my stitching on the back layer, that was something that didn't work in the end)
    Pin these layers together, or if you prefer, sew around the outside edges with a 1/8" seam allowance

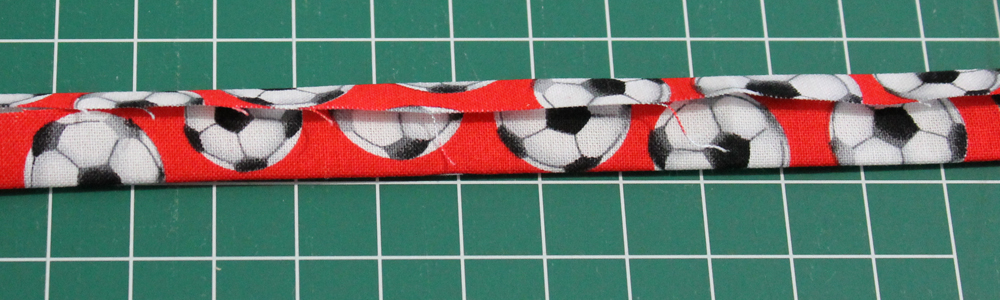
    Cut a strip of main fabric 1-1/2" wide x width of fat quarter.  Fold in thirds, wrong sides together, so that the inside raw edge is against the crease but the outside raw edge falls in the middle of the strip.

    Zigzag over the raw edge with matching thread.

    Cut the strip into 4 equal lengths.  Arrange them on the back of your menu holder as shown in the photograph, with the top and bottom points in the centre of the rectangle.  Ensure that all raw ends of the strips are outside the edge of the rectangle (they must be caught into the binding).  Pin or baste in place.

    Cut a length of binding fabric 2" x approx 35".  Fold and press as above, then fold and press a 1/4" hem on one short end.  Starting with the end of the binding that you just pressed the hem on, attach binding to the back, mitering the corners as you go.  When you reach the beginning again, overlap the end of the binding as per photo.

    Press the binding over to the front of the menu holder, ensuring that the raw edge is tucked under the 1/4" hem.

    Top stitch the binding down from the front.

    Cut a piece of magnetic paper approximatly 6-1/2"x8-1/2" and slip under the straps on the back.

    Attach to fridge and insert your menus.

    Order pizza and enjoy the rest of your evening!

    LinkWithin

    Related Posts Plugin for WordPress, Blogger...